

Seedance 2.0 multi-shot generation works best when you write a short shot list instead of a long description. The model needs to know where one shot ends, what the next shot adds, and which details cannot change. If the prompt only says “make a cinematic story,” Seedance has to invent the story structure, camera plan, and continuity rules at the same time.
This guide gives you a repeatable way to plan multi-shot AI video in C Dance AI. It covers the prompt structure, reference roles, timing, camera language, continuity checks, failure diagnosis, and when to split a sequence into separate clips. The examples are writing templates, not controlled benchmark results. Your source images, selected model, duration, and review standard still determine the final output.
Start here: C Dance AI
If you want to try the workflow while reading, use these direct paths:
- Open the C Dance AI homepage
- Open Workspace with Seedance 2.0 selected
- Open the Seedance 2.0 video generator
- Read the text-to-video guide or the image-to-video guide
Seedance 2.0 multi-shot: the quick answer
Use multi-shot when the clip needs a clear progression. A reliable first draft has four parts:
- Subject anchor: the person, product, or object that carries through the sequence.
- Beat plan: two or three timed moments with one visible action each.
- Camera logic: a framing and movement that serve the action in each beat.
- Continuity rules: details that must stay stable, plus the transition between beats.
Open the Seedance 2.0 workspace with text-to-video selected when you want to test a prompt. For a reference-led sequence, switch to the multimodal-reference mode in the workspace and give every uploaded asset a job. The Seedance 2.0 model page explains the available starting points, while the common prompt mistakes guide covers overloaded instructions and vague actions.
What multi-shot generation is actually solving
A single-shot prompt asks the model to sustain one visual idea. A multi-shot prompt asks it to manage a change in framing, action, or location while preserving the thread of the scene. Those are different tasks.
The useful question is not “How do I make a longer clip?” It is “What new information should arrive after the first shot?” A product sequence might establish the package, show the key use, and finish on the benefit. A character scene might show an entrance, a discovery, and a reaction. A tutorial opener might establish the problem, show the action, and reveal the result.
Multi-shot is a poor fit when the visual should feel like one uninterrupted move. A slow product orbit, a person walking through one room, or a seamless liquid transition usually benefits from one shot. Adding an internal cut creates another continuity problem without adding information.
Choose the final frame before writing the first shot
Start with the ending because it gives the sequence a destination. Decide what should be visible, where the subject should be, and what emotional or commercial point the viewer should remember.
For a product clip, the ending may be a clean hero frame with the label facing the camera. For a story beat, it may be the character's hand on a door handle. For a social opener, it may be the first readable gesture or reaction. The exact ending matters less than having one.
Write the destination in one sentence:
Ending: finish on a steady close view of the open train door, with the traveler's hand still on the handle and the station lights reflected in the wet metal.
That sentence stops the final shot from becoming another unrelated invention. It also gives you a concrete check after generation. If the ending does not land, you can decide whether the prompt needs a repair or whether the model is struggling with the requested transition.
Build a shot list instead of a paragraph
The simplest multi-shot structure is a two-column plan: what changes and what stays fixed. Keep the list short enough to fit the selected duration.
| Beat | What changes | What stays fixed |
|---|---|---|
| Opening | The subject enters the station | Rain, coat, station architecture |
| Middle | The subject studies the departure board | Face, bag, cool blue lighting |
| Ending | The subject opens the train door | Coat, hand position, wet reflections |
Then translate the table into timed instructions. A 10-second clip can give three seconds to the opening, four seconds to the decision, and three seconds to the ending. Do not give every movement its own timestamp. Use time markers for meaningful changes or cuts.
[Shot 1, 0-3s] Wide establishing shot inside a rainy central train station. A traveler in a charcoal coat enters from the left carrying one dark suitcase. The camera stays low and static while the train lights reflect on the wet floor.

[Shot 2, 3-7s] Cut to a medium rear three-quarter shot. The same traveler stops beneath the glowing departure board and looks up. The camera makes one slow push forward. Keep the coat, suitcase, station architecture, and cool blue lighting unchanged.

[Shot 3, 7-10s] Cut to a close-up of the traveler's right hand opening the train door. The camera holds steady as warm carriage light falls across the wet metal. End with the door open and the hand still on the handle.
The prompt states the order, the visible action, the camera rule, and the continuity constraints. It does not ask the model to invent a second character, a new location, or an unrelated visual style halfway through the clip.
Use the right mode in C Dance AI
C Dance AI exposes several ways to start a Seedance generation. The mode should match the information you already have.
| Starting point | Use it when | What the prompt must add |
|---|---|---|
| Text-to-video | You have an idea but no visual anchor | Opening composition, subject, action, camera, sound, and ending |
| First frame | You have a controlled opening image | What changes after the first frame and what remains fixed |
| First and last frame | You know both endpoints | The physical path, timing, and camera transition between them |
| Multimodal reference | You have several assets with different jobs | A role for each image, video, or audio reference |
Use the first-frame mode when the opening composition is more important than invention. Use the first-and-last-frame mode when the transition itself is the creative problem. Use multimodal reference when the sequence needs an identity image, a movement reference, and an audio or rhythm cue at the same time.
The model selection must remain explicit in conversion links. A useful test link is open the Workspace with Seedance 2.0 selected. Do not use a generic workspace link when the reader needs to reproduce the exact workflow.
Give every reference asset one job
Mixed references help only when the model can tell them apart. A practical role map looks like this:
- Image 1 defines the character's face, hair, and wardrobe.
- Image 2 defines the location and lighting.
- Video 1 defines the body movement or camera path.
- Audio 1 defines the beat, voice, or ambient rhythm.
Write those assignments before the action. Do not upload six files and hope the model discovers the hierarchy.
Use @Image1 as the identity reference for the traveler. Preserve the face, short black hair, charcoal coat, and dark suitcase.
Use @Image2 for the train station architecture and cool blue lighting.
Use @Video1 only for the slow push-in and the timing of the head turn. Do not copy its setting or performer.
Use @Audio1 for the rhythm of the station announcement and the train brakes. Do not add music.

Create a 10-second three-shot sequence. Follow the shot list below and keep the traveler recognizable in every shot.
This structure is more useful than repeating adjectives such as “cinematic,” “beautiful,” or “high quality.” It tells the model which uncertainty each asset should remove.
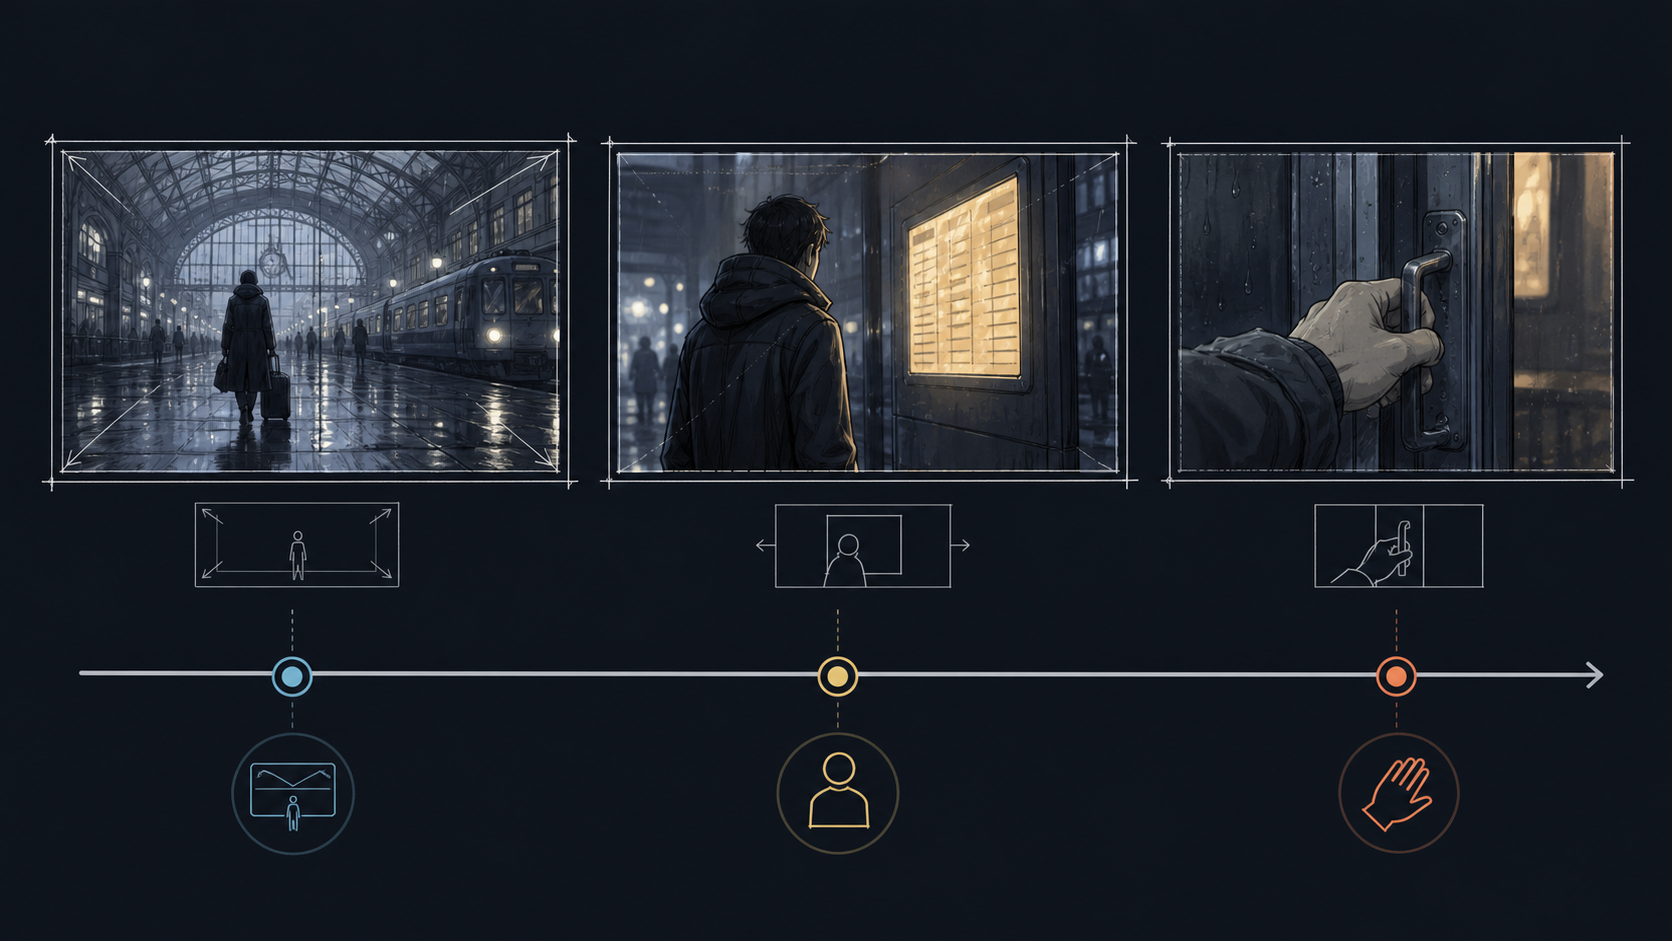
The image above is an original planning illustration. It demonstrates shot order and framing, not a real Seedance output. Use the same distinction in your own article assets and case studies. A diagram can explain the workflow, but it should never be presented as generated footage.
Write camera instructions that can fit the beat
Give each shot one dominant camera rule. A wide establishing shot may stay static. A reaction shot may push in. An action shot may track beside the subject. The camera instruction should be physically compatible with the subject's movement.
Shot 1: locked low wide shot, no camera movement.
Shot 2: one slow push forward from medium distance to a tighter medium frame.
Shot 3: locked close-up on the hand and door handle, no orbit and no zoom.
Avoid stacks such as “drone shot, orbit, whip pan, zoom, rack focus, handheld tracking” inside a short beat. Each label competes for time and may produce a camera that changes direction without a reason.
If you need a transition, describe the action that causes it:
The train doors close in the background. Cut on the final warning chime to the close-up of the traveler's hand reaching for the next carriage door.
The cut has a cause, an audio cue, and a new subject priority. “Make a dynamic transition” does not.
Treat audio as a timing reference
Seedance 2.0 can use audio in a multimodal workflow, and the C Dance AI interface exposes sound controls for supported models. Audio is most helpful when it removes a timing question. A brake squeal can mark a cut. A beat can tell the model when the subject turns. A spoken line can define the length of a reaction.
Separate the audio roles:
Dialogue: no spoken dialogue.
Soundscape: rain on the glass roof, distant platform announcements, suitcase wheels on wet tile, and one clear train brake squeal at 7 seconds.
Music: none.
Timing: cut from the departure-board shot to the hand close-up on the brake squeal.
If exact dialogue is the goal, keep the line short and identify the speaker. Do not ask for several lines, complex action, and multiple camera changes in a six-second clip. Review the mouth movement and the audio separately because a visually strong sequence can still have unusable speech.
Make the first test deliberately boring
The first render should answer one question: does the sequence hold together? Use a simple subject, a stable location, two shots, and one camera move. Leave complex effects, fast action, and dense dialogue for the next pass.
Two-shot continuity test, 8 seconds total.
Shot 1, 0-4s: medium shot of a courier placing one package on a wooden table. Static camera, warm window light.
Shot 2, 4-8s: cut to a close-up as the same courier opens the package. Keep the hands, sleeves, package color, and table unchanged.
Constraint: no extra people, no text, no camera rotation, no background music.
If this simple test drifts, adding a bigger story will not solve the problem. Check the reference, camera demand, aspect ratio, and model mode first. If it holds, add one new variable, such as a second location or a stronger transition.
Diagnose broken continuity by symptom
Do not rewrite the whole prompt after every failed generation. Match the visible failure to one likely cause.
| Symptom | Likely cause | First repair |
|---|---|---|
| Face or outfit changes after the cut | Weak reference or changing identity wording | Reuse one clean reference and copy the same identity block |
| The second shot starts in a new location | Transition is not stated | Name the cut and keep the environment in the continuity block |
| Camera moves in several directions | Too many camera verbs | Keep one dominant movement per shot |
| Action skips or freezes | Too many beats for the duration | Remove one action or split the sequence into separate clips |
| Audio arrives at the wrong moment | Sound is described as mood only | Attach the sound to a beat or transition |
| Text becomes unreadable | Text rendering is a hard constraint | Avoid small text, use a clean end frame, or add typography in editing |
The fix should be small enough that you can tell whether it helped. Change the reference, the shot count, or the camera rule, but not all three at once.
When to split the sequence into separate clips
Multi-shot generation is useful, but it is not a requirement. Split the work when the story needs more than three major actions, when the subject must change location, or when a cut should be edited frame by frame.
Separate clips give you more control over retries. You can regenerate the reaction shot without losing a successful opening shot. You can also use the last frame of one clip as the first-frame reference for the next. The cost is an editing step and the need to match lighting, scale, and motion direction at the join.
Use a single multi-shot generation when the model can carry the whole sequence with a small number of connected beats. Use separate clips when the editorial cut is more important than the convenience of one generation.
A practical 15-second storyboard template
This template is suitable for a product reveal, creator opener, or short narrative. Replace the bracketed fields and keep each beat concrete.
Subject anchor: [one person, product, or object]. Preserve [identity, material, color, and position] across every shot.
Setting: [one location], [time of day], [lighting condition].

[Shot 1, 0-4s] Establish [the subject and the initial problem]. Use [framing] and [camera rule].
[Shot 2, 4-10s] Show [one physical action that changes the situation]. Use [framing] and [camera rule].
[Shot 3, 10-15s] Resolve on [the final state or benefit]. Use [framing] and [camera rule].

Audio: [dialogue, soundscape, or music]. Place [important sound] at [beat].
Continuity: keep [three or four details] unchanged. No extra characters, no unrelated props, no unplanned location change.
The template is intentionally plain. It gives you a stable structure for testing. Style language can be added after the action and continuity are working.
A product-ad variation
Product ads need a clear hierarchy because the model can easily turn the product into a decorative prop. Put the product's shape, label, and final position in the continuity block.
Subject anchor: the same matte black travel mug from @Image1. Preserve its cylindrical shape, silver lid, small white logo mark, and right-facing handle.
Shot 1, 0-3s: wide kitchen counter at sunrise. The mug sits beside a folded map. Slow push toward the mug.
Shot 2, 3-10s: cut to a close detail as a hand pours coffee into the mug. Keep the logo facing camera; steam rises without covering it.
Shot 3, 10-15s: cut to a medium hero frame. The mug is lifted and carried toward the door. End with the mug in the foreground and the bright doorway behind it.
Audio: pour sound, one ceramic tap, quiet morning room tone. No spoken dialogue.
After the video works, add a concise benefit line in the prompt only if the model can render the text reliably. For exact brand typography, keep the generated footage clean and add the final type during editing.
Review the full clip, not the best frame
Pause at every cut and inspect the end of the clip. Check the subject's identity, object geometry, hand placement, camera direction, lighting, background, and audio timing. A polished first frame can hide a broken transition.
Record the result in a small review table:
| Check | Pass condition | Result |
|---|---|---|
| Subject | Same person or product in every beat | Pass or note the drift |
| Shot order | Each beat arrives in the requested order | Pass or note the skipped action |
| Camera | Movement stays within the shot rule | Pass or note the unwanted move |
| Join | Cut has a readable cause or visual match | Pass or note the discontinuity |
| Audio | Dialogue and effects land on the intended beat | Pass or note the mismatch |
| Ending | Final frame delivers the planned point | Pass or note the unresolved action |
This review makes retries cheaper because it turns “the video feels wrong” into a specific repair.
How C Dance AI fits the workflow
C Dance AI is an independent platform that brings several models into one Workspace. For a Seedance test, start with the Seedance 2.0 video generator, choose the mode that matches your reference assets, and confirm the model before submitting. The workspace exposes the selected model, duration, aspect ratio, reference uploads, and sound controls for the current integration.
When you need ready-made examples, browse the Seedance 2.0 prompt library. For a beginner workflow, the text-to-video guide explains how to start with one action. For an image-led sequence, read the image-to-video guide. These pages serve different jobs: this article is about sequence planning and continuity, not a general list of prompts.
Limits and honest expectations
Seedance 2.0 can produce impressive connected shots, but multi-shot generation does not guarantee continuity. Small identity shifts, object deformation, text errors, and audio distortion can still appear. ByteDance's own model information describes strong multimodal reference and controllability while also noting remaining issues with detail stability, text rendering, and complex edits.
Do not promise a fixed success rate from a few showcase clips. Community posts are useful for finding pain points such as character drift, overlong prompts, and audio timing, but they are individual observations. If a clip is for a paid campaign, review every frame, verify rights for every uploaded reference, and keep a clean non-identifying alternative when a real person's likeness is involved.
Final checklist
Before you call a multi-shot generation usable, confirm:
- The final frame has a clear job.
- The sequence has two or three beats that add new information.
- Each beat has one primary action and one camera rule.
- Every image, video, and audio reference has a named role.
- The subject anchor is repeated without changing identity details.
- The duration leaves enough time for each action and line of dialogue.
- The cut has a visible or audible cause.
- The full clip passes the continuity table, not just the first frame.
- A failed result receives one controlled repair before a full rewrite.
- You can explain why a single shot or separate clips would not be a better fit.
Start with the C Dance AI Workspace, run the two-shot continuity test, and keep the first successful prompt as your baseline. Once the join holds, add the story detail that actually matters to your viewer.
Return to C Dance AI when you are ready to turn the tested shot list into a finished clip.
Continue inside C Dance AI
- Go back to the C Dance AI homepage when you want to choose another workflow.
- Run the selected Seedance 2.0 Workspace test with the shortest useful shot list.
- Browse the Seedance 2.0 prompt library for starting templates.
- Read common Seedance 2.0 prompt mistakes before expanding the sequence.
For the newer model workflow, see the Seedance 2.5 prompt guide.
If a sequence must connect two exact endpoint images without a cut, use the AI video first-and-last-frame prompt workflow before expanding it into multiple shots.
If the same person must survive those cuts, build the identity pack and shot anchors with the AI video character consistency workflow before generating the sequence.
For each storyboard beat, define the physical camera path with the AI video camera movement prompt guide before combining it with subject action.