

Character consistency usually breaks before the video model starts moving. A vague identity, a weak reference image, or a shot that hides the face gives the model too much to invent. The repair is a staged workflow: define the person once, approve a still image for each shot, animate one shot at a time, and score drift before editing the sequence together.
Start with the working routes
Use these paths while you follow the guide:
- Open C Dance AI to move between image and video work in one workspace.
- Build an identity frame with GPT Image 2 when the face, clothing, or composition needs a controlled edit.
- Animate an approved frame with Seedance 2.5 after the still image passes review.
- Check the Seedance 2.5 model route for the current generator entry point.
The model parameter matters. A generic workspace link leaves the reader to reconstruct the setup, while these links open the mode used at that point in the process.
The short answer: split identity from motion
A single prompt should not invent a character, costume, location, performance, camera move, and edit at once. Separate those jobs.
- Write a compact identity brief.
- Build a small character reference sheet.
- Decide what stays fixed across the sequence.
- Generate one still anchor for each shot.
- Animate each anchor with restrained motion.
- Score five visible kinds of drift.
- Repair the first broken shot instead of restarting everything.
This process adds an approval point between image generation and video generation. That extra step costs less than repeatedly generating clips whose faces cannot cut together.
Why characters drift between AI video shots
Video models have to solve identity and motion at the same time. They see pixels and prompt instructions, not a production bible that automatically follows the character from one generation to the next. Every new angle creates missing information.
A front portrait does not fully specify a profile. A waist-up image does not define the character's height or shoes. A dark scene can hide the eye color and hairline that made the first image recognizable. When the model fills those gaps, the result may still look plausible, but it no longer looks like the same person.
Drift also appears inside a clip. Fast head turns, large changes in expression, motion blur, partial occlusion, and aggressive camera moves can weaken the visible evidence that anchors the face. The model then reconstructs details from frame to frame.
Treat consistency as an information problem. Give the model a clear answer for every detail the shot is likely to expose.
Step 1: write an identity brief that you can repeat
Start with the features a viewer would use to recognize the character. Keep the block short enough to paste into every image prompt without rewriting it.
Character: Mara, early 30s, oval face, high cheekbones, straight black bob ending at the jaw, blunt fringe, dark brown almond-shaped eyes, small silver hoop in the left ear.

Wardrobe: mustard field jacket over a charcoal crew-neck shirt, dark straight-leg trousers, worn black leather boots.

Proportions: medium height, narrow shoulders, compact athletic build.

Signature detail: thin diagonal scar through the right eyebrow and a red fabric camera strap worn cross-body.
Concrete features work better than labels such as “beautiful,” “heroic,” or “cinematic.” Those words may influence style, but they do not tell the model how to reconstruct a face from another angle.
Separate permanent details from shot details. Hair length and the eyebrow scar belong in the identity block. Rain, a surprised expression, and a low camera belong in the shot prompt. Mixing them makes it harder to see which instruction caused a change.
Step 2: build a compact character reference sheet
The smallest useful pack usually includes a neutral front view, a three-quarter view, a profile, a full-body view, and one close detail of a signature object. Keep the lighting plain. Dramatic shadows and colored gels may look good, but they conceal the information the later shots need.
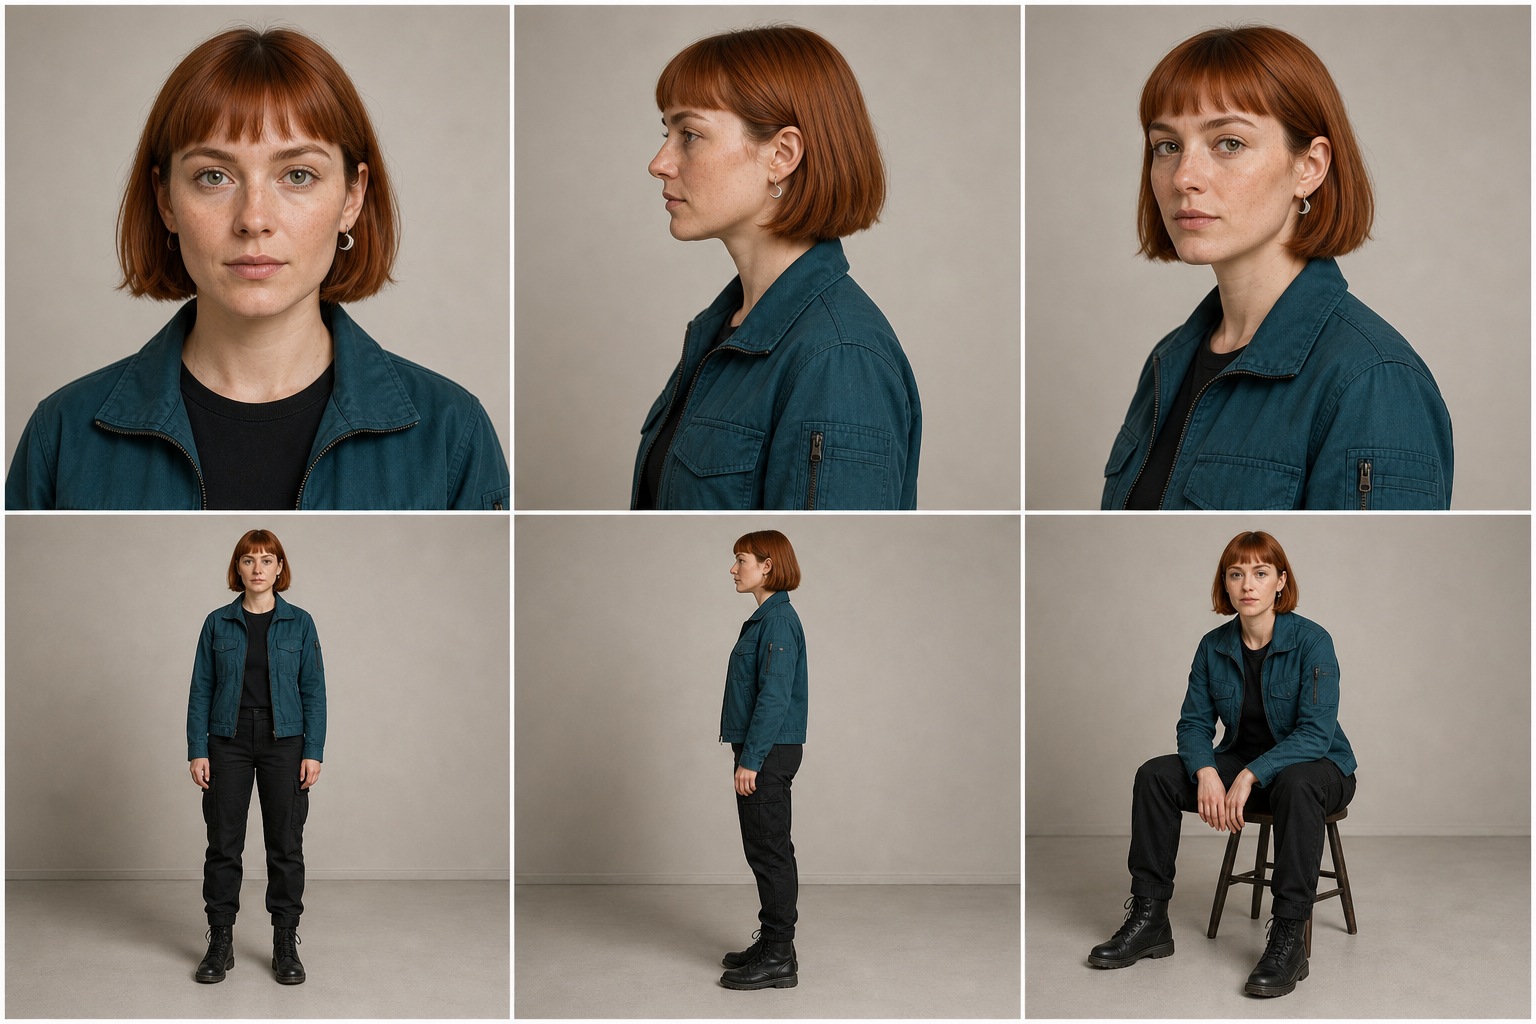
The image above is an original planning illustration, not a claim about output from a specific model. It shows the coverage a reference sheet needs: repeatable facial landmarks, stable wardrobe colors, full-body proportions, and a close view of the signature strap and scar.
You can build the sheet in the GPT Image 2 image editor or use Nano Banana Pro for a reference-led edit. Approve one identity before asking for more angles. If the first portrait is still changing between attempts, a larger sheet will multiply the mismatch.
Use the approved portrait as the identity reference. Create a clean character sheet on a neutral gray studio background.

Show five separate panels: front portrait, left three-quarter portrait, left profile, full-body standing pose, and close detail of the right eyebrow scar and red camera strap.

Keep facial proportions, jaw-length black bob, blunt fringe, eye shape, skin tone, mustard jacket, charcoal shirt, body proportions, and accessories unchanged. Use even neutral lighting. No dramatic pose, no added jewelry, no text labels.
Check the sheet before moving on. The profile should still carry the same nose, chin, hair length, and ear placement. The full-body panel should match the build implied by the portraits. Delete a conflicting panel instead of preserving it as another reference.
Step 3: write a continuity ledger before the shot list
A continuity ledger is a small table that separates allowed changes from protected details. It prevents a location or wardrobe change from slipping into the prompt without a decision.
| Shot | Allowed to change | Must stay fixed |
|---|---|---|
| 1. Archive entrance | Location, wide framing, walking pose | Face, bob length, jacket, red strap, body proportions |
| 2. Map inspection | Expression, hand position, medium framing | Scar side, eye shape, jacket color, strap direction |
| 3. Alarm reaction | Lighting intensity, head turn, close framing | Hairline, nose and chin, left earring, eyebrow scar |
| 4. Exit | Camera position, running action, exterior rain | Full outfit, height, build, strap, boot shape |
Write “must stay fixed” only for details that are visible in that shot. A boot constraint adds noise to a tight face close-up. The close-up needs stronger facial constraints instead.
If the sequence has several intentional cuts, plan their timing in the Seedance 2.0 multi-shot storyboard guide. The continuity ledger answers who remains on screen. The storyboard answers what the viewer learns after each cut.
Step 4: create one approved anchor frame per shot
An anchor frame turns an abstract shot description into visible evidence. It fixes the character, pose, wardrobe, camera angle, and environment before the video model has to infer motion.
Do not reuse the same front portrait for every shot. A profile shot needs a profile anchor. A running wide shot needs a full-body anchor. Create each anchor from the same identity pack, then compare it with the approved sheet.
Use the approved Mara character sheet as the identity reference.

Create the opening frame of a cinematic archive scene. Mara enters a tall records room from the left, shown in a medium-wide three-quarter view. She wears the same mustard field jacket, charcoal shirt, dark trousers, black boots, silver left-ear hoop, and red cross-body camera strap. Preserve the right-eyebrow scar, jaw-length black bob, face shape, and body proportions.

Cool overhead practical lights, dusty shelves, restrained blue-gray palette. Camera at chest height with a 35 mm field of view. Mara is mid-step, looking toward a paper map on a distant table. No other people. No text. No wardrobe changes.
Review anchors side by side at the same zoom. Look at the distance between the eyes, jaw width, nose length, fringe shape, scar position, shoulder width, and strap direction. Small errors in a still image often become larger during motion.
For a transition that must land on a specific pose or composition, read the first-and-last-frame prompt guide. Endpoint control is useful when the final frame has editorial value, but both endpoints still need to pass the identity check.
Step 5: animate the anchor with one motion job
Open Seedance 2.5 in image-to-video mode and upload the approved anchor. Give the person one main action and the camera one main instruction. Short tests expose drift sooner and cost less to repair.
Preserve the woman's identity, facial proportions, jaw-length black bob, right-eyebrow scar, mustard jacket, red camera strap, and body proportions from the input frame.

She takes two measured steps toward the map table and stops. Her left hand reaches toward the edge of the paper map. The camera makes one slow, steady push forward while staying at chest height. Natural cloth movement and subtle breathing. Keep the cool archive lighting and shelf geometry stable.

No cut, no orbit, no zoom jump, no new people, no wardrobe change, no hairstyle change, no face morphing.
The negative constraints should target likely failures. A long list of every imaginable defect dilutes the useful instructions. For this shot, identity, camera continuity, and the empty room matter. Lip sync, explosions, and aerial movement do not.
The planning video below illustrates how shot-specific anchors can cut into a sequence. It is an owned storyboard demonstration, not generated proof of character persistence.
Step 6: score drift on five visible axes
“Looks like the same person” is too loose for review. Score the features separately so the repair prompt has a target.
| Axis | Pass condition | Common failure |
|---|---|---|
| Face | Eye spacing, nose, jaw, mouth, and scar remain recognizable | Face narrows, age shifts, scar swaps sides |
| Hair | Length, fringe, part, and color remain stable | Bob grows past the jaw or fringe opens |
| Wardrobe | Garment type, color, and major seams match | Jacket changes shade or gains a collar |
| Proportions | Height, shoulder width, limb length, and build remain plausible | Wide shot produces a taller, broader body |
| Signature details | Earring, strap, scar, or prop stays on the correct side | Strap reverses direction or accessory disappears |
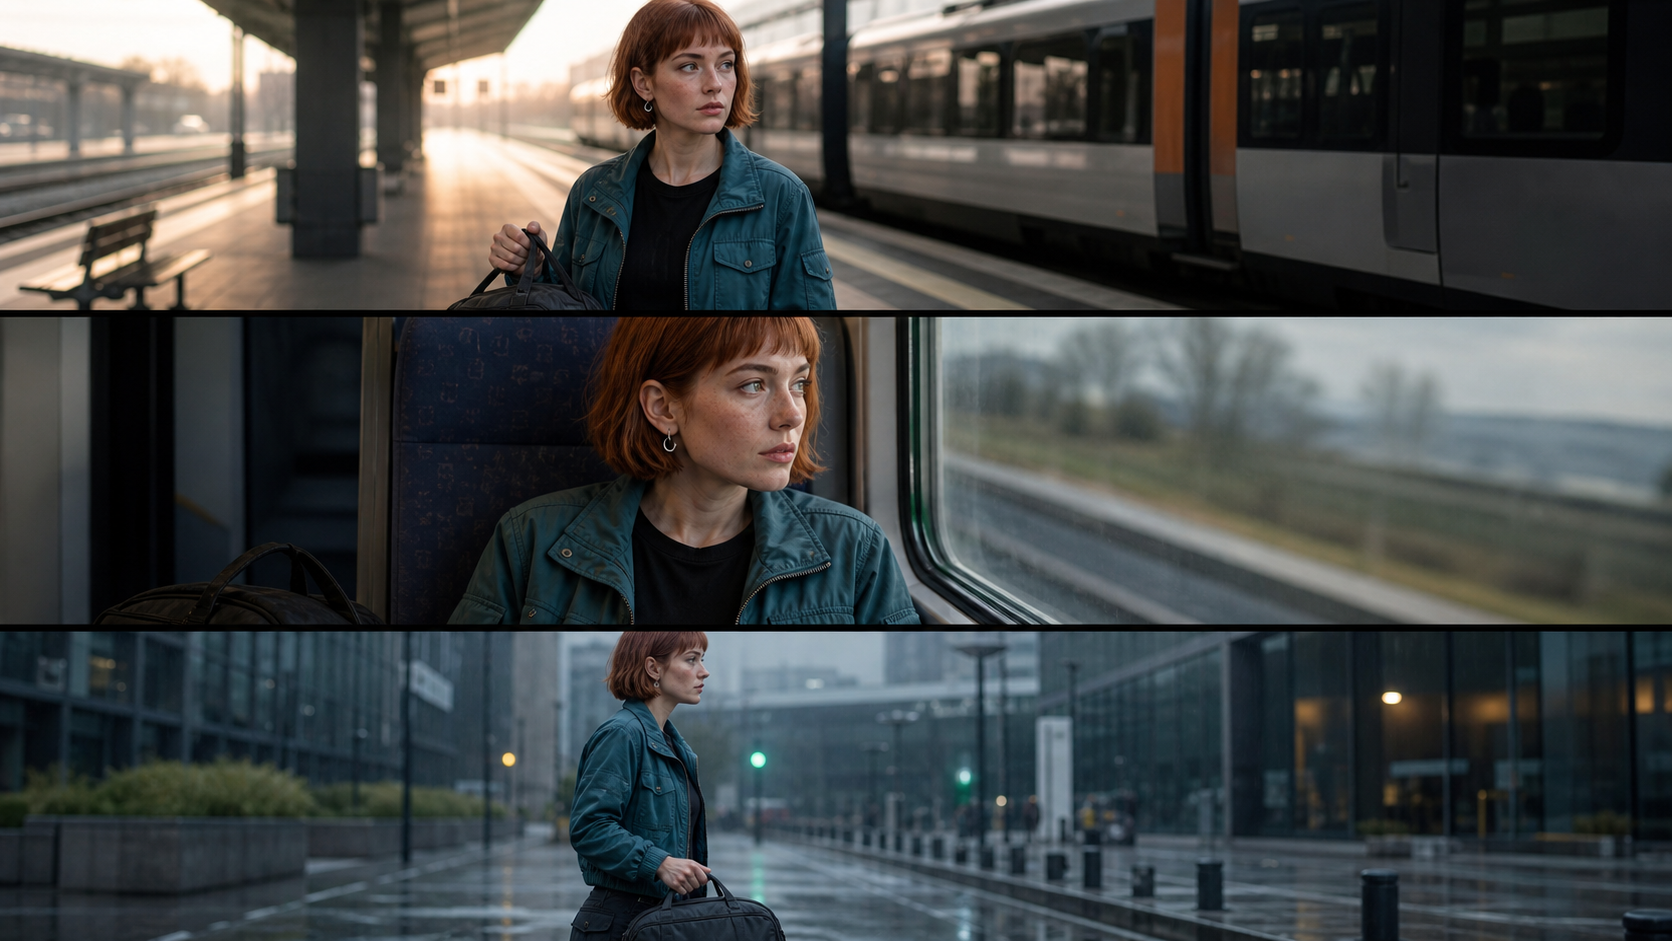
Review the first frame, the point of greatest motion, and the last frame. A clip can begin correctly and drift during a turn. If you only inspect the thumbnail, you will miss the frame that makes the edit feel wrong.
Set a practical acceptance rule before generation. For a social clip, a minor jacket-texture change may be acceptable if the face holds. For a narrative close-up, a changed scar position can break continuity even when everything else looks polished.
Step 7: repair the first frame where identity breaks
Find the earliest bad frame. The cause usually appears just before it: a head rotation, an occlusion, a lighting change, an extreme expression, or a cut to an under-specified angle.
Repair in this order:
- Shorten or simplify the subject motion.
- Remove the competing camera move.
- Strengthen the anchor for the angle where drift begins.
- Crop closer if the face became too small to preserve.
- Regenerate only that shot and compare it with the same scorecard.
Change one variable per attempt. If you replace the anchor, rewrite the motion, change the camera, and alter the lighting together, a better result will not tell you which repair worked.
Repair target: preserve the approved face during the head turn.

Use the revised three-quarter anchor as the first frame. The woman turns her head only 25 degrees toward the alarm light and holds. Keep her mouth closed and expression tense but restrained. The camera stays locked. Preserve eye spacing, nose length, jaw shape, right-eyebrow scar, fringe line, left-ear hoop, and skin tone.

No full profile, no camera orbit, no motion blur across the face, no lighting color change, no new accessories.
If the face still changes at the same angle, rebuild the anchor from a reference that already shows that angle. Prompt repetition cannot supply geometry that the references never defined.
Prompt templates for three difficult shots
These templates assume you already have an approved anchor. Replace bracketed details, then remove any constraint that the frame does not need.
Dialogue close-up
Preserve the character's face, hairline, [signature detail], wardrobe neckline, and skin tone from the input frame.

The character speaks one short sentence with restrained mouth movement and natural blinking. Expression remains [calm / concerned / amused]. Locked close-up, no camera movement. Soft light stays fixed across the face.

No head turn beyond 10 degrees, no exaggerated smile, no teeth distortion, no hairstyle change, no accessory change.
Dialogue is difficult because the mouth and cheeks change continuously. Keep the line short and the head nearly fixed during the first test. Add more performance after the identity passes.
Walking full-body shot
Preserve the character's height, build, face, hairstyle, full outfit, footwear, and [signature prop] from the input frame.

The character walks four steady steps along [location]. Natural arm swing and cloth movement. Side-tracking camera at matching speed, constant distance, no change in lens or height. Keep the background direction and lighting stable.

No cut, no orbit, no sprint, no body-shape change, no footwear change, no duplicate limbs.
Full-body motion exposes proportions and clothing construction. Use an anchor that clearly shows the shoes and silhouette. A cropped portrait cannot reliably define them.
Reaction shot with a head turn
Preserve the approved facial structure, eye shape, nose, jaw, hair length, [scar or mark], and [earring side] from the input frame.

The character hears a sound and turns 20 degrees toward camera right, then holds. Eyebrows lift slightly while the mouth stays closed. Locked medium close-up. Background and lighting remain unchanged.

No full profile, no fast snap, no camera movement, no face morphing, no swapped accessories.
Head turns reveal geometry that a front image hides. Use a three-quarter reference and limit the first test. Increase the angle only after the smaller turn holds.
A practical shot-by-shot production order
Generate the easiest identity shot first, not the chronological opening. A stable medium close-up gives you a useful reference for later repairs. Then produce profile or full-body shots, where missing information creates more risk.
For a four-shot scene, the work order might be medium anchor, close anchor, wide anchor, then profile anchor. The edit order can remain wide, medium, close, profile. Production order and story order do not need to match.
Keep filenames tied to the shot and version:
01-archive-wide-anchor-v03.png
01-archive-wide-motion-v02.mp4
02-map-medium-anchor-v04.png
02-map-medium-motion-v01.mp4
03-alarm-close-anchor-v02.png
03-alarm-close-motion-v03.mp4
That naming makes a rejected anchor harder to reintroduce by accident. Save the prompt beside the accepted file and record the exact model route used for the run.
Common failures and the shortest useful fix
The character looks related, but not identical
The identity block is probably too general or the anchor was approved too loosely. Compare facial landmarks instead of overall mood. Rebuild the anchor with the approved portrait and name the two or three features that changed.
The face holds, but hair and wardrobe drift
Move hair and clothing into the repeated identity block. State exact length, part, garment type, and color. Use a full-body or three-quarter anchor when the shot exposes more than the face.
The first frame matches and the last frame does not
Reduce motion and camera complexity. Inspect the midpoint to find where evidence disappears. A locked camera and smaller head turn often reveal whether movement caused the drift.
Different shots have different lighting on the face
Use shot-specific anchors with a shared lighting rule. Do not expect one bright studio portrait to define a character inside every dark or colored environment. Preserve facial geometry while adapting the anchor to the scene's actual light.
The prompt keeps getting longer without improving the result
Split identity, shot, motion, and exclusions into separate blocks. Delete constraints that do not apply to the shot. If the angle is missing from the references, create that reference instead of adding more prose.
A bad shot forces changes to the whole edit
Lock accepted clips. Repair only the first failed segment and maintain the same entry and exit framing. The first-and-last-frame guide can help when the replacement must connect to two approved neighboring shots.
Limits you should plan around
No prompt guarantees identical pixels across independent generations. Occlusion, extreme poses, stylized lighting, fast motion, and long clips increase uncertainty. A character may also remain recognizable while clothing texture or small accessories change.
Reference count alone does not solve that problem. Conflicting images can make identity less stable because they offer several answers for the same feature. Use fewer references with clear roles, and remove any panel that disagrees with the approved identity.
The workflow also needs human review. Automated similarity scores can help sort results, but a production decision depends on which details matter to the story. A missing earring may be harmless in a wide shot. A scar moving to the other eyebrow may be unacceptable in a close-up.
Run the workflow in C Dance AI
Start by building or repairing the identity in the GPT Image 2 editor. If you prefer a reference-led image workflow, open Nano Banana Pro. Approve one anchor per shot, then move each accepted frame into Seedance 2.5 image-to-video.
Keep the identity pack, continuity ledger, anchor frames, prompts, and drift scores together. That record turns a vague “try again” loop into a production process where each failed shot has a specific repair.
When camera travel contributes to identity drift, use the AI video camera movement prompt guide to test the path separately from subject motion.